The demos
The description for both demos should be read in order. Even the light demo's description is not repeated in the complete one's so don't skip a section unless you are very familiar with everything and can easily jump around the tutorials.
Light Demo
This video describes what this sample is and how it works.
There is a Demos folder in the asset which contains either 1 or 2 demos depending on the version of the package you have. One of them is the light demo which is described here and the other one is the complete demo described in the next section.
How to run the demo
Simply running the scene in the demos/LifeSimLight/Scenes folder runs the demo. You can use the fly cam to observe the agents. Just use WASD to move and hold right click and move the mouse to look around.
Important folders
- All actions and considerations use the built-in actions and considerations which rely on blackboards and our movement components to work. Read the related pages linked here to learn more about them.
- Scripts contains all the custom code for the sample which is a simple script just setting some blackboard keys and the fly cam.
- Prefabs Contains all prefabs, behavior definitions and blackboard definitions.
- The Art folder outside this demo and in the Demos folder contains all the artwork
The AI design
The agents use the same AI and it is pretty simple.
In the Prefabs/Agent/AI demo you can find the blackboard definition and the agent behavior files related to the agent in the demo.
The blackboard definition contains 4 floats:
- Hunger which shows how hungry the agent is.
- Energy which shows how tired an agent is.
- Bladder which shows how much does the agent need to go to the WC.
- Entertainment which shows how bored the agent is.
It also contains 4 GameObject keys which tells the agent which WC, TV, Refrigerator and Bed belong to this agent.
LightDemoAgent.cs sets the object keys based on what the designer dragged to its slots in the inspector.
myBlackBoard.SetGameObject("Bed", bedGameObject);
myBlackBoard.SetGameObject("WC", wcGameObject);
myBlackBoard.SetGameObject("Refrigerator", refrigeratorGameObject);
myBlackBoard.SetGameObject("TV", tvGameObject);
Before doing this it also needs to get the blackboard component and set the values of the float attributes to something random so all different agents don't start doing the same thing like this
myBlackBoard = GetComponent<BlackBoard>();
myBlackBoard.SetFloat("Hunger", Random.Range(0f, 1f));
myBlackBoard.SetFloat("Energy", Random.Range(0f, 1f));
myBlackBoard.SetFloat("Bladder", Random.Range(0f, 1f));
myBlackBoard.SetFloat("Entertainment", Random.Range(0f, 1f));
This randomization needs to be done in a smarter way but this is simple enough and good enough for the sample. You probably want to set these based on some parameters like starting hour of the simulation or a scenario/quest/any other thing.
The same LightDemoAgent.cs calculates some personalized values per agent to change the 4 float attributes using them over time so an agents gets hungry faster and another needs more sleep.
void Start()
{
    personalizedHunger = Random.Range(0.01f, 0.02f);
    personalizedEnergy = Random.Range(0.01f, 0.02f);
    personalizedBladder = Random.Range(0.01f, 0.02f);
    personalizedEntertainment = Random.Range(0.01f, 0.02f);
}
Then every frame it does something similar to this for all attributes
float hunger = myBlackBoard.GetFloat("Hunger");
if (hunger > 0)
        myBlackBoard.SetFloat("Hunger", hunger - personalizedHunger * Time.deltaTime);
As you can see it reads the current hunger from the blackboard and then decreases it by the personalized amount and sets it on the blackboard again. For all values 1 means they are full and there is no need to do an action to increase them and 0 means they are not full. You might have designed it differently so a full bladder means bad and an empty one is good but we wanted them to be uniform so a full bladder = 1 and means you don't need to go to the bathroom.
Now let's look at the AI behavior made for the utility AI of this agent in Prefabs/Agent/AI/LightDemoAgent.asset.
It contains 8 actions which for of them are for moving toward a place like the TV for entertainment or the bed for sleeping which are named MoveToX and 4 others which actually do the thing like watching TV or sleeping.
All movement actions use MoveToGameObjectAction which moves to a gameobject specified by a Gameobject key on the blackboard.
All other actions use BlackboardActionBase which allows them to change blackboard keys. This is the action that almost all other built-in actions inherit from it.
All actions use two considerations, one is for checking the float for their attribute on the blackboard which is the same on both and the other is a distance check consideration which has different curves so when the agent is far from the object, the MoveTo scores higher and when it gets close, the actual action scores higher.
For example MoveToBed uses a BlackboardFloatConsideration which it named EnergyFloat and a BlackboardGameObjectDistance Consideration which it uses to check the distance with the bed. The curve is like this

This curve means for values close to the max range which is set to 10 it will return a low score and for values close to 0 it returns a very low score as well but for stuff in the middle it returns high values.
The SleepAction shares the EnergyFloat consideration which checksthe float attribute in the blackboard but its BedDistance has a very different curve.
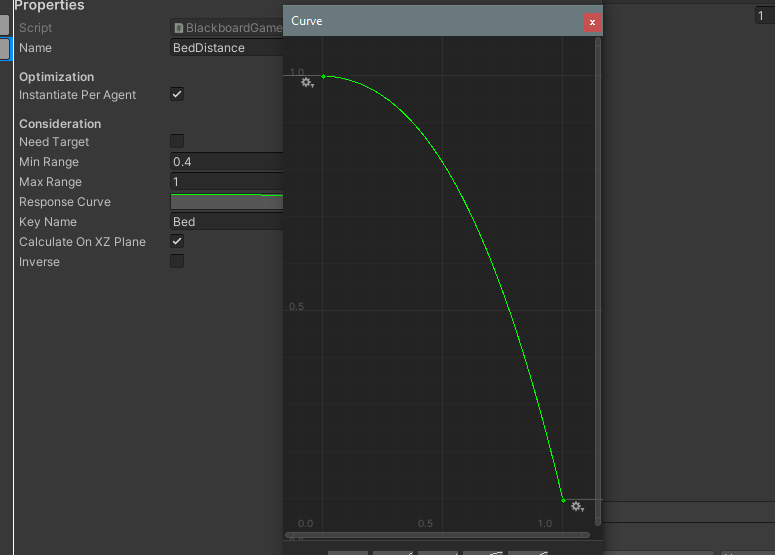
The range is different and is between 0.4 and 1 meters and the closer to 0.4 it is , it returns a higher value so as soon as we are close to the 0.4 then this scores very high so this action is chosen instead of MoveToBed.
All other actions and their move ones are designed similar to sleep and move to bed and you can take a look at them yourself.
Complete life simulation / Immersive world demo
This is a Video Tutorial of a good part of the complete sample but you still need to read this for the description of every action and consideration.
This sample uses influence maps, smart objects, utility Ai, AI tags, blackboards and all other features to create an immersive world.
How to run the demo
Simply running the scene in the demos/LifeSimDemo/Scenes folder runs the demo.
- You can use the fly cam to observe the agents. Just use WASD to move and hold right click and move the mouse to look around.
- You can also focus on characters by clicking on them. There is a camera button to follow that object in the UI and also the UI shows attributes of the agent and its current action.
- Use the Tab key to move between agents and focus on them one by one. To focus on the next type of agent like go from humans to cats or from cats to mice, use Shift+Tab.
Important folders
- Materials contains all the materials assigned to the different characters and objects.
- UI contains the atlas for the UI icons you see on the screen.
- SmartObjects contains all smart object definitions which are used in the project. These define how many slots an object has and where are the slot positions and things like that.
- Prefabs contains all prefabs used in the game and their ai definitions like agent behaviors, blackboard definitions, influence maps templates and ... Smart object definitions are not defined here and are in their own folder. For example Prefabs/Cat contains 4 prefabs for the base cat and the 3 different colors of cat and an AI folder containing the cat's influence map template, blackboard definition for all cat attributes and the agent behavior file for the Utility AI's Brain component.
- Scripts contains a few general scripts like the follow cam and the main game/simulation manager and folders containing other scripts.
- Scripts/UI contains the code for custom UI controls and the main UI Manager which updates the UI.
- Scripts/SmartObjectBehaviors contains the custom SmartObjectBehavior classes we implemented for the car and mouse hole smart objects.
- Scripts/Agents contains the main agent code for all agent types outside their AI code which changes their blackboard attributes over time. It also contains the code required for cat companionship behaviors like cats greeting each other or humans petting cats.
- Scripts/Actions contains all of our custom actions for the demo.
- Scripts/Considerations contains all considerations for the demo.
- The Art folder outside this demo and in the Demos folder contains all the artwork
The AI design
The AI of this is much more complex because many more things are going on so we describe it in parts.
Trees
We want to spawn oaks for humans to gather and mice to eat. Trees and oaks are the things you need to look into.
OakTree.csis attached to trees and spawns oaks from the trees. The script finds where to spawn the next oak by looking at oaks influence map and then if it found a free place, it spawns an oak.The check is like thisif (oakMap.SearchForValueWithRandomStartingPoint(0.5f, SearchCondition.Less, oakMap.WorldToMapPosition(transform.position), 3, out resultPosition))- The Oak prefab has an
InfluencerAgentattached which writes the oak's template on the oaks map only once. They also have an AITags component so it has a tag which allows others to query it.
These oaks are eaten by mice and humans and are gathered by humans as their job so new ones are needed so the tree generates new ones every few seconds which you can check in OakTree.cs
Mice
Mice have their houses/mouse holes and live in there, come out and eat oaks and will try to run away if cats try to hunt them. Since cats eat mice, our mice are the only agents which breed more of themselves. Actually the holes generate new mice when needed.
We are going to look at the hole and the mice behavior now. The Prefabs/Mouse folder contains both the MouseAgent and the MiceHole prefabs. It also contains the AI folder which contains the influence map template, blackboard definition and agent behavior assets for the mouse and the smart object definition for the hole.
The hole is a smart object which has 3 slots for 3 mice and it has a behavior attached called MouseBreedingBehavior. The SmartObject component makes this prefab a smart object and it needs a smart object definition to know how many slots it has and it also needs to add the behaviors to the behaviors list of the SmartObject component. The breeding behavior is pretty simple so let's take a quick look at it.
private void Start()
{
    StartCoroutine(CheckForSpawningFirstMouse());
}

public IEnumerator CheckForSpawningFirstMouse()
{
    while (true)
    {
        yield return new WaitForSeconds(Random.Range(0, 15));

        bool hasAtLeastOneMouse = false;
        foreach (var item in smartObject.GetSlots())
        {
            if (item.owner != null)
            {
                hasAtLeastOneMouse = true;
                break;
            }
         }

        if (!hasAtLeastOneMouse)
        {
            InstantiateNewMouse();
        }
    }
}
This code simply breeds new mice whenever the house is empty but we also have code in the behavior so whenever the mouse uses the house, if it is not hungry, it breeds a new one and becomes fully hungry.
public override void OnUsedByAgent(GameObject agent, SmartObject smartObject, int slot)
{
    base.OnUsedByAgent(agent, smartObject, slot);
    if (agent.GetComponent<BlackBoard>().GetFloat("Hunger") > 0.4f)//The mouse can only breed if it is not hungry :)
        StartCoroutine(BreedNewMouse(agent));

}

IEnumerator BreedNewMouse(GameObject agent)
{
    yield return new WaitForSeconds(3);

    if (smartObject.GetFreeWithoutOwnerSlotIndex() != -1)//if there is a free slot
    {
        if (agent != null) // May be killed by cats or humans
            agent.GetComponent<BlackBoard>().SetFloat("Hunger", 0);

        InstantiateNewMouse();
     }
}


private void InstantiateNewMouse()
{
    var smartObject = GetComponent<SmartObject>();
    var slotIndex = smartObject.GetFreeWithoutOwnerSlotIndex();
    var slotPosition = smartObject.GetSlotPosition(slotIndex);
    var newMouse = Instantiate(mousePrefab, slotPosition, Quaternion.identity);

    smartObject.SetOwner(newMouse, slotIndex);
    newMouse.GetComponent<MouseAgent>().SetHome(smartObject);
}
The OnUsedByAgent() method is called by the smart object on its behaviors when one of its slots are being used by an agent.
Smart objects can be claimed/reserved and then used and slots can have owners.
These houses can have 3 slots for 3 mice to live in them and when those die, the slots become free.
Here when a mice start using a slot it means she came back home to sleep.
We check if the mouse's hunger level is not that bad then it can breed a new mouse. Of course we check to see if a free slot exists or not. if no free slots exist smartObject.GetFreeWithoutOwnerSlotIndex() returns -1 so we make sure that is not the case.
To learn more about smart object you can read their docs here.
The mouse itself has only few attributes in its blackboard definition.
- Attacked is a bool which is set to true when a cat attacks the mouse so it freezes in its place.
- Hunger is a float which shows the mouse's hunger level. breeding behavior of the hole sets this to 0 when the mouse is breeding and eating oak increases it.
- OakLocation is a Vector3 set by the influence map system described below. This is a location which has a more density of oaks for eating.
- LowDangerPosition is another Vector3 set by another influence map described below. This is a place with less cats and humans which we can move to.
The MouseAgent prefab uses a BlackBoard component with this definition to read/write these values.
It also has an InfluencerAgent which puts its influence on the Mouse map when it moves on. This map is used by humans and cats and other systems to know where the mice are.
It also uses an AITags to assign itself a tag so others can query the AI Tags system for the Mouse tag and find mouse agents.
It also has a Brain component which executes the utility AI logic for the mouse and we describe below.
The custom script MouseAgent is attached to the prefab which does the following activities.
- It tells the main manager script when it is created and when it is destroyed so it can be added/removed in the list of trackable objects for the camera.
- Has methods to get/set its house which is used by the breeding behavior above and other code.
- Set its hunger to 0.1 at start. Mice don't get hungry over time in this script.
- Handles the selection logic for the UI which is described later on and is the same for all agent types.
The brain component references an agent behavior asset with a couple of actions and their considerations. The file is Prefabs/Mouse/AI/MouseAgentBehavior.asset. This behavior contains the following actions and their considerations.
Sleep
This action is for the mouse sleeping and Uses NoopAction which does nothing so the mouse just stays where it is.
The code for the action truely does nothing other than an optional stopping of the movement if you set its flag to true.
This is the OnStart() which gets executed whenever the action is selected to execute.
protected override void OnStart()
{
    base.OnStart();
    if(StopMoving)
    {
        var movement = Brain.GetComponent<IAIMovement>();
        if (movement != null)
            movement.StopMoving();
    }
}
If you want to know more about the movement components and how they move the agents, you can read more at the built-in actions and considerations page.
The only consideration used for this action is the TimeOfDayConsideration which is set to return 1 between 3AM and 9AM.
This is one of the 3 custom considerations in the simulation project which does not use a built-in consideration.
The code of the GetValue() method is like this
protected override float GetValue(Component target)
{
    int currentHour = DayAndNightCycle.Instance.GetHour();
    if (currentHour >= MinAcceptableHourRange && currentHour < MaxAcceptableHourRange)
    {
        return 1;
    }
    return 0;
}
As you can see it simply reads the current hour from the DayAndNightCyclce script and if it is between the specified hours, it returns 1 and otherwise it returns 0.
Search For Oak
This action searches for a high density of oak in an area to move to it. The action itself is actually just a MoveToVector3Action which takes a blackboard key to move to.
However the key is shared between the action and its InfluenceMapConsideration which searches the okas map around the mouse position and puts the resulting high density position in the same key.
As a result of this we only do the map search once and if the search finds a good enough point and the mouse is hungry enough, this action scores high and the movement toward the point happens.
The action itself can be read about in the Built-in page so we will not repeat how it moves to the vector3 specified but the considerations worth taking a look at.
The HungerConsideration is a BlackboardFloatConsideration which checks a float value in the blackboard to find its score. It uses the hunger value and the closer to 1 it is, it returns a higher value but the inverse checkbox is checked so actually it returns higher scores when the score is close to 0.
This is a built-in consideration as well.
This consideration returns 0.7 at max so the action can never score higher than 0.7.
We discuss the reason when we look at the other actions but basically there are other actions which are more priority than this like eating an oak if it is close enough which should execute if their score is high so this search action should never score higher than them.
The other consideration is of the type InfluenceMapConsideration and searches the Oak map in 20 meters radius for values greater than 0.8 so if we have a position close to an oak in our 20 meters, this will find it and puts it in the blackboard key specified which is set to the same OakLocation key that the action uses for movement.
This consideration only returns 1 if the influence map search is successful and otherwise returns 0 so the action will not execute if we cannot find a point with a value higher than 0.8 in our 20 meter radius.
The order of considerations matter since if the first consideration returns 0 in non-editor builds of the project, the rest of the considerations are not executed so you should put more expensive considerations like influence map searches after the simpler ones like blackboard checks. Expensive things are the things which take memory/CPU like path finding, influence map searches, ray casts and collision checks and other spatial queries.
Move To Target Oak
This action moves to a specific oak we targetted and uses the MoveToTargetWithTag which is a built-in action.
The Search For Oak action searches the area for a high density of oak and moves toward it but this one chooses a specific oak to move to and eat.
MoveToTargetWithTag asks for a tag to find potential targets and a radius to look for them and uses the AITags system to do the search.
Here we look in our 8 meters radius for object with the Oak tag.
If we wanted to we could exclude objects which have another tag like oaks which are dirty or ruined or ... or we could look for a more general tag like mouse food and set the tag both on oaks and walnuts and maybe other things which mice eat which i don't like to mention here.
The considerations of this action are different from the search one so when in the correct situations, this cores higher than the search. The radius is smaller here so between 20 to 8 meters, the search action will obviously win if it can find something but if we have something in our 8 meters then this action will have targets so its considerations are executed to find a good target. The HungerConsideration is similar to the search for oak action's hunger consideration and only checks the blackboard to see how hungry the mouse is. However its max value is 0.9 unlike the one for the search action which at most returns 0.7. The curve shapes are almost the same but the max point chosen for them is differnt in the curve so the curve for this one goes to a higher point. The other consideration which has NeedTarget set to true is the TargetDistance consideration and for targets closer than 4 meters, it returns a value closer to 1, the closer it is to you so a target with 2 meters of distance will score higher than one in 3 meters.
Actions with Considerations with NeedTarget set to true execute their considerations with NeedTarget set once per target and then choose the target with the highest score.
This target is put in chosenTarget field of the ActionBase class which is accessible to all actions which you implement. then if the action with its best target wins the competition with other actions and gets selected, you know which target is your best one and you should use.
The considerations without NeedTarget set execute only once for the action and its brain and are not supposed to look at targets to return their score.
You can learn more about this at the targetting page.
The influence map consideration for the search action and the target distance consideration for this action can return scores up to 1 but since the hunger consideration for this action can return higher values the one in the search action, this action wins if we have a target close by. This is very important because when we have a target in close proximity, the influence map search can find a good position too. The next action has a similar to these two as well but the hunger for that returns values up to 1.
Eat Oak
EatOak action uses DestroyTargetWithTag action which is a built-in one and destroys its chosen target found by its tag.
The built-in actions have a changer argument which changes the blackboard for the GameObject which the brain is attached to.
We use the changer here to add a value of 0.2 once to the Hunger key of the blackboard so as a result this eating action increases the Hunger attribute by 0.2 (1 means full and no hunger actually) and also destroys the oak so it essentially does anything needed for eating.
If you wanted to show a VFX, you could put it in the OnDestroy() method of a script attached to the oak or could inherit from this action and override OnFinish() to show the effect.
The considerations of this action are set in a way that when we are close enough to an oak, it scores higher than Move To Oak and Search For Oak. There are 2 considerations. The TargetDistance one looks for targets which are at most 1 meter away and the closer they are, it returns a higher score. And the BlackboardFloatConsideration looks at the Hunger key but for most values it returns one unless we are really close to 1 and don't need to it. This means that if we are close to an oak by accident and we are half full, we still will eat it since we can have more food and it is close so why not. This is probably in line with what a real mouse would do as well. The fact that both of the considerations for this action return values up to 1 means that when we are close to an oak, Move To Oak scores 0.9 and Search For Oak scores 0.7 but Eat Oak scores 1.
Move To Home
The mouse moves to its home which is set at birth time. This is a custom action which we take a look at its code.
It first caches its movement componet which is a built in component. This one uses NavmeshBasedMovement component since it uses a NavMeshAgent to move around and not a CharacterController.
protected override void OnInitialized()
{
    agentMovement = Brain.GetComponent<IAIMovement>();
}
This is good practice to cache components which you want to use a lot to save yourself calling GetComponent every time this wants to execute.
protected override void UpdateTargets()
{
}

protected override void OnStart()
{
    base.OnStart();
    var home = Brain.GetComponent<MouseAgent>().GetHome();

    if (!agentMovement.MoveToPosition(home.transform.position, ReachToDistanceSuccessfully))
        ActionFailed();
}
We don't have targets in this action so UpdateTargets() is empty and actually is not called either.
It would have been called if at least one of the considerations had NeedTarget set to true.
In OnStart() which is called each time the action is selected to execute once, we simply get hour home from the MouseAgent component and ask the movement component to move to it.
If it returns false it means we failed so we fail the action.
In this simulation this will almost never happens since the path finding to our home should fail for this to not succeed.
The movement function asks for a callback to call when it succeeds and the callback contains the following code.
void ReachToDistanceSuccessfully()
{
    var home = Brain.GetComponent<MouseAgent>().GetHome();
    var mySlotIndex = home.GetFirstOwnedSlotIndex(Brain.gameObject);
    // This should not happen unless we have force removals/takeovers which we don't yet.
    // However the mouse commits suicide if this happens which is extreme but whatever, unrealistic things which don't happen in the simulation don't need messing up with.
    if (mySlotIndex == -1)
    {
        Destroy(Brain.gameObject);
        ActionFailed();
        return;
    }

    var slotPos = home.GetSlotPosition(mySlotIndex);
    if (home.Claim(mySlotIndex, Brain.gameObject))
    {
        Brain.transform.position = slotPos;
        home.Use(mySlotIndex, Brain.gameObject);
    }


    ActionSucceeded();
}
As you can see this method simply checks if our slot is still ours and if yes, frist tries to claim the slot of the smart object which should succeed and then sets our position to the exact position of the slot since the NavMeshAgent moves very close to it but not exactly on it.
Then it calls the Used() method of the smart object which calls OnUsed in all behaviors and causes the breeding behavior described above to make a new mouse if this mouse's hunger value is high enough and free slots exist in this house.
As you can see in the joke comment in the code, if we add something to the simulation so the mice can forcefully take each other's houses then our mice commits cuiside and destroys itself since it has no home to return too but this doesn't happen in our simulation since ownerships are respected here and there is some good law and order coded in the sim :)
By the way whenever you call succeeded or failed on an action, it no longer executes and the brain starts thinking again to evaluate all actions and their considertions to see which one it should select as the next best action to execute.
Now let's see when the mouse wants to go home. There are only 2 considerations.
There is a hunger consideration which is a BlackboardFloatConsideration and checks hunger and its curve returns values close to 1 if we are near full so a hungry mouse never goes home.
The other consideration is a custom one which checks if the home has free slots to go back to or not.
The GetValue() for the consideration looks like this
protected override float GetValue(Component target)
{
    MouseAgent mouse = target.GetComponent<MouseAgent>();
    if (mouse != null && mouse.HomeHasFreeSlot())
        return 1;
    else
        return 0;
}
As you can see it is a very simple code which simply checks if the mouse has a home and if the home has empty slots to make more children or not. If there is no free slots then the mouse cannot make more mice so does not have the motivation to go back. It does not sound good but keeps the simulation interesting by keeping the mice outside when there are too many of them so cats can eat them and then they can make more of themselves. We are not trying to code any moral or social or ... messages into this. We just tried to make it look interesting so keep your interpretations to yourselves.
As a result of these considerations which both can return up to 1, if a mouse's home has free slots and it is mostly full, it will go home to make more mouse. Maybe we should have called in incubator or something else. They sleep anywhere and eat anywhere and only make babies at home? whatever.
Before making this action happen only when we need to make new mice, we did not have the move to low danger locations action and mice would go home a lot. As a result cats searched for high density areas for mice and would roam around mice holes and ate them as soon as they came out. It was not that interesting so we made this action more rare and added more intelligence to mice.
Move To Low Danger Location
This action uses a built in MoveToVector3Action and shares its blackboard key with its influence map consideration.
The interesting thing is that the influence map that the search consideration looks at is the map of humans and cats combined and a low danger position is defined as a position which the least amount of cats and humans are around it.
This action has two considerations which one of them is the same BlackboardFloatConsideration which looks at the hunger value and after your hunger is higher than half or so its value goes up fast and for 0.8 or so and higher returns 0.8 which is its highest value.
The other consideration is an InfluenceMapConsideration which checks the LowMiceDanger map in its 40 meter radius for values higher than 0.6.
If you look at the object for the map
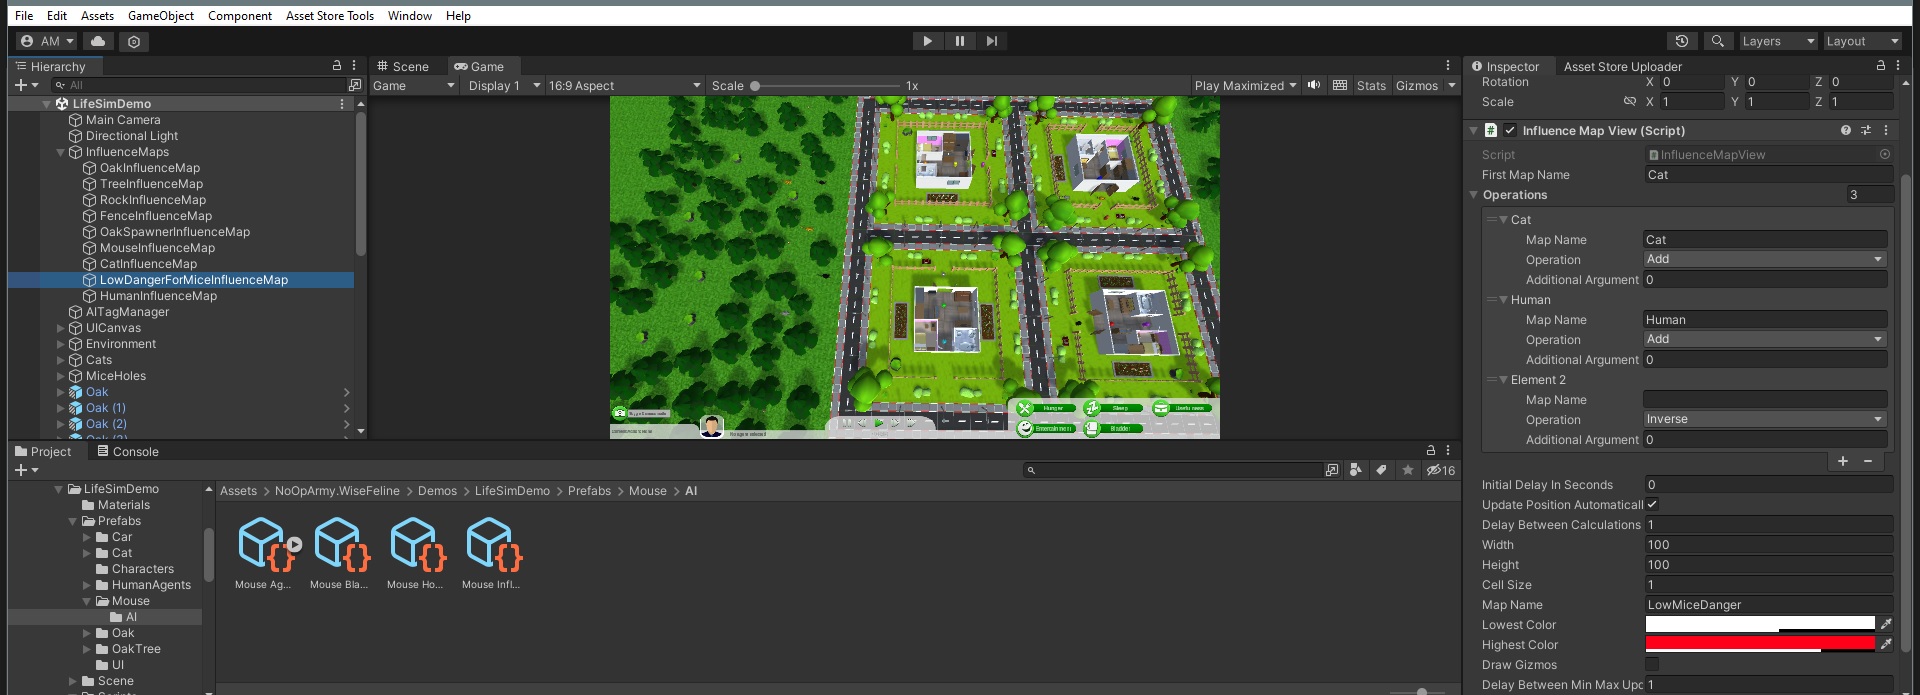
It is an influence map view which combines other maps. It starts with the cats map and adds cats and humans to it and then inverses it so higher values are for the places which are actually empty of cats and humans. It uses cats twice because they are more dangerous for mice.
As a result this consideration returns 1 when it can find somewhere which is relatively empty of humans and cats. The found position is put in the blackboard under the same LowDangerPosition key which the action uses to move to its position.
Under Attack
This action is for mice to freeze when they are under attack from cats so the hunt is more beautiful. The action has only one consideration which checks the bool key called Attacks in the blackboard and if true returns 1. As a result when under attack this usually gets the highest score since it does not care about anything else including hunger which most other mice actions check.
The action is a NoOp like the one described above and causes the mouse to freeze and get eaten by the cat.
Cats
Cats are maybe the most complex agents or at least are on pair with human agents so you are in for a treat. They seek each other to greet and rub their heads. They hunt mice to eat. They sleep and get petted by humans and ... They have less actions than humans but more custom code in their actions. All this said everything is relatively simple and much simpler than other Ai algorithms so don't worry and read on.
The cats have 4 prefabs. 1 for the base cat prefab and 3 prefabs for gray, black and orange cats. The differences are very minimal and other than the meshes, they just have their colors as AI Tags so they can great their friendly factions and not other factions. They don't fight so don't worry about that.
The cat prefabs have an AITags component which assigns them a Cat tag and a tag based on their color which is Gra, Orange or Black.
They have an InfluencerAgent which adds their influence using their template to the Cat influence map.
They have a Brain which executes the utility Ai and also the NavMeshBasedAIMovement and NavMeshAgent components for movement.
There is a Blackboard component which has a definition defining all blackboard keys for the cat.
The keys are
- Hunger which shows how hungry the cat is. The closer to 0 it is, the cat is more hungry.
- Emotion which shows how much entertainment and love from others the cat needs. The closer to 0 it is, the need is higher for greetings and petting behaviors.
- MouseLocation is a vector3 used by the search action and its influence map consideration to find the locations which have a high density of mouse in them.
- TargetCat, Waiting and Companionship are used in the companionship system used later on which is the system governing how cats greet each other and how humans pet them.
Let's look at all the actions and their considerations one by one.
Morning Sleep
This uses the NoopAction and just stops the movement of the cat which uses the same NavMeshAgent and NavmeshBasedMovement that the mice use too.
The only consideration is the TimeOfDay consideration which for this one returns 1 when the time range is between 6AM and 10AM.
This manual is created to be read in order so read the mouse one first to know more about the actions and considerations used.
Night Sleep
The only difference between this and the morning sleep is the time range that the cat goes to sleep.
The time range for the TimeOfDay consideration is between 4PM and 8PM.
Search For Mice
This action uses MoveToVector3Action to move to a vector3 key on the blackboard attached to the cat but the key is shared with one of its considerations which searches to influence map for mice to find a place which has a lot of mice in it.
The considerations are
- HungerConsideration which is a
BlackboardFloatConsiderationand checks the Hunger key in the cat's blackboard and for the values closer to 0 returns a higher value but its max value is about 0.7 so considerations for actually eating a mouse get higher score than this when the mouse is close enough. - The other one is an
InfluenceMapConsiderationwhich looks in the mouse map in the 30 meter radius of the cat to find values greater than 0.8 which means there are a lot of mice in that area. If successful tyhen it puts the position in the MouseLocation key which the action uses to move to. This is similar to the search for oak action in the mouse prefab above which has more description.
All mice have an InfluencerAgent component and put their template on the map where they are so the map allows us to find them pretty easily.
If we wanted to we could try to find mice which are alone or places which mice exist but no cats are around but no need to make it more complex for the sample really.
Hunt Mouse
This action has custom code and is defined in HuntingMouseAction.cs.
This said the custom action inherits from MoveToTargetWithTag and essentially tries to move to objects tagged with Mouse but does some additional things on top.
The important parts of the code are
protected override void OnStart()
{
    base.OnStart();
    trailRenderer.startColor = Color.red;
    trailRenderer.endColor = Color.red;
}

protected override void OnFinish()
{
    base.OnFinish();

    trailRenderer.startColor = Color.white;
    trailRenderer.endColor = Color.white;
}
As you can see the only modifications the action does are making the trail renderer of cats red when they start hunting and turning it back to white when the action finishes. In this way you can easily add your code on top of the built-in actions or your other custom made ones.
The action is set to look for objects tagged Mouse in its 12 meter radius and will move toward the best of them if chosen.
When arrived it calls ActionSucceeded() which causes OnFinish() to get called.
OnFinish() is called in the case of failures or even another action getting a higher score and forcing this to change as well so there is no situation that the action changes and OnFinish() not getting called.
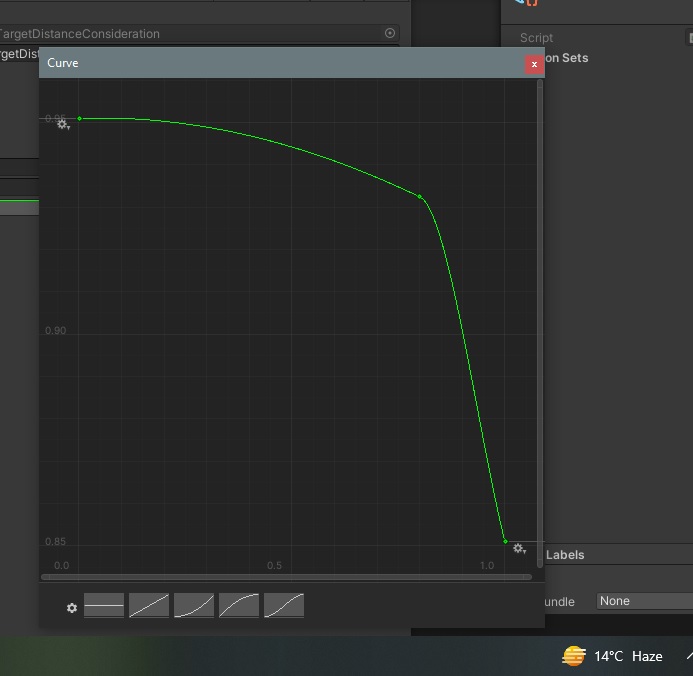
The are two considerations. HungerConsideration which looks at the Hunger float on the blackboard and returns values up to about 0.9. The curve returns 1 for higher values which means less hungry but the inverse is checked so actually the closer to 0 you are, this returns a higher value. This does not return 1 so the actual mouse eating behavior has a chance of scoring higher. The other consideration is a TargetDistance which considers targets up to 12 meters and the closer a target is, it returns a higher value and actually returns something close to 0.95 for a big range of values because it makes sense for it and it wants to move toward the target so 2 meters and 5 are not that different for this action. The curve looks like this:
We don't show all curves here but I encourage you to examine them and see what shapes we used for each action. Dave Mark's book and talks in the resources section talk about these a lot as well.
Eat Mouse
This action has some custom code and inherits from DestroyTargetWithTag which destroys its target and finds targets using their tags.
The custom code on top of that other than changing the trail renderer's color checks the mouse to see if it is already being attacked by another cat or not.
If not it sets the Attacked boolean to true in the mouse's blackboard and then destroys it.
Here it is the code of the action
protected override void OnStart()
{
    base.OnStart();
    trailRenderer.startColor = Color.red;
    trailRenderer.endColor = Color.red;
    MouseAgent mouseAgent = ChosenTarget?.GetComponent<MouseAgent>();
    if (!mouseAgent.WaitToBeEaten())
        ActionFailed();
}


protected override void OnFinish()
{
    base.OnFinish();

    trailRenderer.startColor = Color.white;
    trailRenderer.endColor = Color.white;
}
As you can see the important part of the code is what WaitToBeEaten() returns and its code looks like this:
public bool WaitToBeEaten()
{
    if (myBlackboard.GetBool("Attacked"))
        return false;

    myBlackboard.SetBool("Attacked", true);
    GetComponent<Brain>().Think();

    return true;
}
This code checks to see if the mouse is already being attacked, then it returns false and we will not try to take food from another cat. Otherwise we mark it as attacked and nobody else will try to take it from us.
The main work happens in the parent class which is DestroyTargetWithTagAction and its code looks like this:
protected override void UpdateTargets()
{
    ClearTargets();
    AddTargets(AITagsManager.Instance.GetTagsAroundPoint(Brain.transform.position, radius, includedTags, excludedTags));
}

protected override void OnStart()
{
    base.OnStart();
    startTime = Time.time;
}

protected override void OnUpdate()
{
    base.OnUpdate();
    if (Time.time - startTime >= delayForDestruction)
    {
        if (ChosenTarget != null)
        {
            GameObject.Destroy(ChosenTarget.gameObject);
            ActionSucceeded();
        }
        else //Something else already destroyed that object
        {
            ActionFailed();
        }
    }
}
The code is pretty simple. In UpdateTargets() we clear all targets and add the new ones using the AI Tags system.
Then after a target and the action are chosen, in OnStart() we just set start time and based on the delay, when the time to kill finally arrives, we destroy the target if it still exists and call it a success and otherwise fail the action.
In the example of EatMouseAction in the child class's OnStart() we might fail the action if the mouse is being attacked by another cat and the OnUpdate() will never gets called and the other cat will destroy the mouse.
Also the action's changer is set to increase the Hunger by 0.5 (fill its bar by half) which is the result of eating a mouse.
Seek Cats
There is a system for cats to greet each other and for humans to pet them and the system requires work from both parties involved so the code is a bit complex. The system is used in this action and the rest of the cat actions and the petting action in humans. So we describe it here.
There is an interface which both humans and cats implement and it starts a companionship, ends it, wiats for one to start and checks if a cat/human busy in another companionship act. It does not differ between a human petting a cat or two cats rubbing their heads with each other.
/// <summary>
/// agents like other cats and humans which want to do friendly actions with cats need to implement this interface
/// The reason is that the petting behavior or cat greetings can only happen in sequence and a cat can be in one of these at a time
/// </summary>
public interface ICatCompanionship
{
    /// <summary>
    /// Tells a cat taht this cat is being petted by a human or being greeted by a cat and should wait for this action to finish
    /// </summary>
    /// <param name="otherCat"></param>
    public abstract void WaitForOtherCompanionship(GameObject otherCat);

    /// <summary>
    /// Is the agent busy in another Companionship
    /// </summary>
    /// <returns></returns>
    public abstract bool IsBusy();

    /// <summary>
    /// A Companionship gets started involving this agent
    /// </summary>
    public abstract void StartCompanionship();

    /// <summary>
    /// Ends a Companionship action and this agent is free to do another now
    /// </summary>
    public abstract void EndCompanionship();
}
The Start and End methods are called by the cat/human which initiates the companionship on the other cat and IsBusy() is naturally called to check if the other party is busy with another cat/human or not.
WaitForOtherCompanionship() is called by the other cat/human to tell the cat to stop moving and wait for the companionship to happen.
The seek action itself has custom code but it inherits from MoveToTargetWithTag. It's code looks like this:
protected override void OnInitialized()
{
    base.OnInitialized();
    CatAgent catAgent = Brain.GetComponent<CatAgent>();
    if (catAgent != null)
        includedTags = includedTags.Concat(catAgent.SeekingCatTag).ToArray();
}

        protected override void OnStart()
        {
            base.OnStart();

            var blackboard = Brain.GetComponent<BlackBoard>();

            targetCat = ChosenTarget.GetComponent<CatAgent>();

            if (targetCat.IsBusy())
                ActionFailed();


            targetCat.WaitForOtherCompanionship(Brain.gameObject);
            blackboard.SetGameObject("TargetCat", ChosenTarget.gameObject);
            blackboard.SetBool("Companionship", true);
        }

        protected override void OnUpdate()
        {
            base.OnUpdate();

            if ((targetCat.transform.position - Brain.transform.position).magnitude < 1f)
                ActionSucceeded();
        }
First I want to show you how simply we implemented factions. Each CatAgent component has a SeekingCatTag array which allows it to say cats of which category it seeks.
Gray cats only seek the Gray tag and the orange and black ones seek both Orange and Black in their cat prefabs so here we add the tags set there to the list of tags which this action will try to find and move to in OnInitialized().
Then inOnStart() we check if the other cat is busy if (targetCat.IsBusy()) and if yes we fail the action.
Otherwise we tell the target to wait for us using the interface methods mentioned above and set the other cat as our TargetCat in our blackboard and set the bool which causes the companionship action to score high.
Companionship is the action used in cats for greeting and in humans to pet a cat.
The last thing we do is that in our update, whenever we are close to the other tag, finish the action by declaring success.
The CatAgent component's waiting function and IsBusy() are defined like this
public void WaitForOtherCompanionship(GameObject otherCat)
{
    myBlackboard.SetBool("Waiting", true);
    myBlackboard.SetGameObject("TargetCat", otherCat);
    GetComponent<IAIMovement>().StopMoving();
}

public bool IsBusy()
{
    return myBlackboard.GetBool("Waiting") || myBlackboard.GetBool("Companionship");
}
We return that we are busy if we started a companionship in our seek action or if another cat called us to wait and our Waiting is set.
WaitForOtherCompanionship() simply stops the cat's movement component and sets Waiting and TargetCat.
The agent has other important functions which are described in the next action.
The considerations for the seek action are many but they are very simple. There is a TargetDistance which considers targets up to 50 meters and at max returns 0.8 for targets which are at its 0.1 mark which is 5 meters when you multiply it by the 50 meter max distance. Then it has a BlackboardBoolConsideration which checks the Waiting key and only returns 1 when it is false. The EmotionConsideration is a BlackboardFloatConsideration which checks the Emotion key and returns high values up to 1 for emotions more than 0.1 and has inverse checked so essentially for anything lower than 0.9 it returns a high value. Cats are very much into playing so this makes sense. The IsCatFreeConsideration has NeedTarget set to true so works on the targets of the seek action and its code looks like this
protected override float GetValue(Component target)
{
    CatAgent cat = target.GetComponent<CatAgent>();
    if (cat != null && cat.IsBusy() || target.gameObject == Brain.gameObject || target.GetComponent<BlackBoard>().GetFloat("Emotion") > 0.6f)
        return 0;
     else
         return 1;
}
If we are busy or the target is ourselves or the target doesn't have a low enough emotion, then this fails. We don't want to greet targets which have an already high emotion. Since the consideration is binary only the 0 and 1 positions of the curve matter which return 0 for 0 and 1 for 1.
Companionship
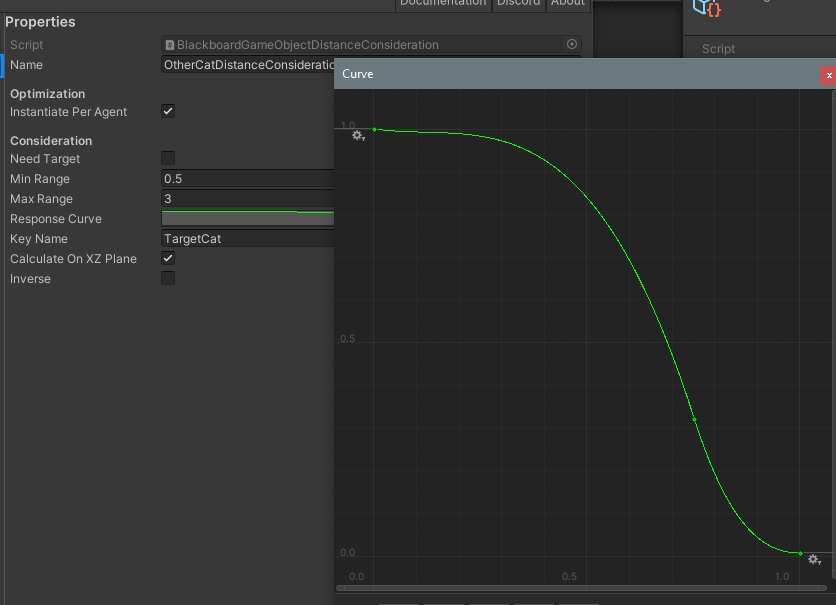
This action is the actual greeting action of the cats and actually is used in humans when they pet cats too. It happens when a cat's Companionship bool key in the blackboard is set to true and its distance to another cat is low enough. The considerations are just a bool for the Companionship key which returns 1 if the bool is set. And a BlackboardGameObjectConsideration which checks the distance to a GameObject set in the TargetCat key and for distances between 0.5 and 3 meters it returns a value between 1 and 0. The curve returns a high value up to half of the max distance and looks like this
Keep in mind that this action is executed on both greeting cats and the human and the cat he/she is petting.
Let's look at the action code itself.
protected override void OnInitialized()
{
    base.OnInitialized();
    myCompanionship = Brain.GetComponent<ICatCompanionship>();
    myBlackboard = Brain.GetComponent<BlackBoard>();
}

protected override void OnStart()
{
    base.OnStart();
    targetCompanionship = myBlackboard.GetGameObject("TargetCat").GetComponent<ICatCompanionship>();
    targetCompanionship.StartCompanionship();

}

protected override void OnUpdate()
{
    base.OnUpdate();

    if (myCompanionship is CatAgent)
    {
        if (myBlackboard.GetFloat("Emotion") >= 0.9f)
            ActionSucceeded();
    }
    else if (myCompanionship is HumanAgent)
    {
        if (myBlackboard.GetFloat("Entertainment") >= 0.9f)
            ActionSucceeded();
    }
}

protected override void OnFinish()
{
    base.OnFinish();

    targetCompanionship.EndCompanionship();
}
In OnInitialized() we get our ICompanionship component and it might be a CatAgent or HumanAgent.
As said before this action is used on both for greeting/petting a cat.
In OnStart() we get our target's Icompanionship based on what is set in the blackboard in the seek action.
Then we call its StartCompanionship() and in OnFinish() we call its EndCompanionship().
OnUpdate() is a bit more interesting since it checks the Emotion or Entertainment key of the blackboard depending on the fact that we are actually attached to a human or a cat and if it is greater than 0.9, the action is succeeded.
The is keyword in C# can check object types and since we know only these two classes implemented the interface we got using GetComponent<T>(), we can know if we are a human or a cat by checking this.
We could have a boolean for the designer to set or check the tags of the object but this is also a way to check this.
The changer of the action is set to repeat an action with delay and to add 0.1 once per second to the Emotion of the cat executing this action so eventually 0.9 is reached. Obviously the one attached to a human will increase its own Entertainment and not Emotion.
Now let's look at StartCompanionship() and EndCompanionship() in CatAgent.
public void StartCompanionship()
{
    if (myBlackboard.GetBool("Companionship") == false)
    {
        myBlackboard.SetBool("Companionship", true);
        myBlackboard.SetBool("Waiting", false);
        GetComponent<Brain>().Think();
     }
}

public void EndCompanionship()
{
    myBlackboard.SetBool("Companionship", false);
}
The Waiting key should be true when we are waiting for a companionship to start but when it gets started, it should become false and Companionship key should be set to true. When the companionship finishes then the Companionship key should be set to false which is what these two methods do. These key changes cause the other cat to go from waiting action to Companionship to increase its Emotion.
Wait For Companionship Cat
This action happens when its single consideration which checks the Waiting key in the blackboard returns 1 and does nothing.
It uses BlackboardBoolConsiderationwith a curve which returns 1 when the Waiting boolean key is set to true.
And the NoopAction.cs does nothing and it even does not stop movement since the previous action which was seeking another cat or the WaitForCompanionship() method called by the other human/cat already stopped its movement.
The Emotion of this cat doesn't change in in waiting but after this the cat will go to Companionship which will increase its Emotion.
Other methods of CatAgent component
private void Awake()
{
    indicator = GetComponent<SelectedIndicator>();
    myBlackboard = GetComponent<BlackBoard>();

    personalizedHunger = Random.Range(minPersonalizedValue, maxPersonalizedValue);
    personalizedEmotion = Random.Range(minPersonalizedValue, maxPersonalizedValue);
}

void Start()
{
    myBlackboard.SetFloat("Hunger", Random.Range(0, 0.7f));
    myBlackboard.SetFloat("Emotion", Random.Range(0, 0.7f));
    myBlackboard.SetBool("Companionship", false);

    LifeSimDemoManager.Instance.AddFollowableAgent(indicator, AgentType.Cat);
}

private void OnDestroy()
{
    if (LifeSimDemoManager.Instance != null)
        LifeSimDemoManager.Instance.RemoveFollowableAgent(indicator, AgentType.Cat);
}

void Update()
{
    float hunger = myBlackboard.GetFloat("Hunger");
    if (hunger > 0)
        myBlackboard.SetFloat("Hunger", hunger - personalizedHunger * Time.deltaTime);

    float emotion = myBlackboard.GetFloat("Emotion");
    if (emotion > 0)
        myBlackboard.SetFloat("Emotion", emotion - personalizedEmotion * Time.deltaTime);

    // Check for mouse click or touch input
    if (Input.GetMouseButtonDown(0))
    {
        // Cast a ray from the camera to the mouse position
        Ray ray = Camera.main.ScreenPointToRay(Input.mousePosition);
        RaycastHit hit;

        // Check if the ray hits the object with a collider
        if (Physics.Raycast(ray, out hit))
        {
            // Check if the hit object is the one you want
            if (hit.collider.gameObject == gameObject)
            {
                LifeSimDemoManager.Instance.SetAsSelectedAgent(indicator, AgentType.Cat);
            }
        }
    }
}
The selection and indicator logic is explained later on in the general simulation code section but the rest of the code is pretty easy and similar to the light simulation's human code. We set initial values for Emotion, Hunger and other blackboard keys and then find some random personalized values for the cat. In Update we reduce Hunger and Emotion by these random and personalized values so all cats don't tend to do the same thing all the time. There are other ways to achieve this like more random selection behaviors in the brain but we chose to use highest score for ease of understanding in the demos.
Human agents
The human agent's behavior has similarities to the light simulation's human agents above so read up on that one first.
The HumanAgent prefab has its own general code in HumanAgent.cs.
It has the Brain for Utility AI, a Blackboard component, a NavMeshAgent and a NavMeshBasedAIMovement, and of course an InfluencerAgent to add its influence to the Human map.
The blackboard for humans is in the AI folder in Prefabs/HumanAgent/AI alongside the agent behavior and the blackboard definition.
- Hunger is the attribute which fills when the agent eats food and depleats over time.
- Energy is the attribute which fills when the agent sleeps and depleats over time.
- Bladder is the attribute which fills when the agent goes to the WC and depleats over time.
- Entertainment is the attribute which fills when the agent watches TV or pets cats and depleats over time.
- Usefulness is the attribute which fills when the agent works and depleats over time.
- Job is an int key which shows what is the job of the agent.
- OakLocation is a Vector3 which is set by an influence map consideration and used by the actions that the human uses to gather or eat oaks.
- TargetCat is a GameObject key which is used by the system which pets cats to know what cat to pet.
- Companionship is a bool key which causes the human agent to give a high score to the petting action.
The influence map template is nothing special to look at so let's go through the AI behaviors.
Many of the actions set an animation parameter name for the On Start Animation Trigger and we actually have an animator with those parameters but unity did not allow us to submit the plugin with mixamo animations so we have capsules for the characters in the demo. You can use this feature of the built-in actions to drive your animations.
Move To WC
Most of the move actions use smart objects but the WC one does not move to a smart object because we wanted it to be different. Smart Objects have ownerships so agents will not use each other's beds but they'll use each other's WCs thanks to this difference.
This action uses the built-in MoveToTargetWithTag action and tries to move to an object in 30 meters with the tag WC.
As said above it also sets a trigger in the animator with the name Walking in its OnStart().
Describing how animations work is beyond the scope of this document and you can read unity's documentation on that.
This might not be enough for your animation needs.
Even the fact that the NavMeshBasedAIMovement allows you to set the velocity of the movement in an animation parameter might not be enough either but in these cases you can inherit from the action and do whatever you need there and call the base methods to do the movement.
The considerations of the action are a TargetDistance consideration which considers up to 100 meters and gets executed per target that the tagging system finds and also a consideration which checks the Bladder float key on the blackboard. The blackboard one returns up to 0.7 and the target distance one returns up to about 0.85 so the actual Wse WC can score higher than this.
Use WC
This action uses the BlackboardActionWithTarget class which finds all objects with the tag WC in 2 meters radius and if it is chosen it simply increases the Bladder float key on the blackboard by 0.5 every second.
It has two considerations
- A BlackboardFloatConsideration which checks the Bladder and it has inverse checked so actually instead of returning 1 for values closer to 1, it will inverse the curve and returns values close to 1 for the times that Bladder is closer to 0.
- The other one is a TargetDistance consideration which for distances between 0.5 and 1.5 meters returns a score which is close to one for the lower half of the distance and naturally anything less than 0.5 will have the 0.5 meters score which is 1.
This action is chosen over the Move To WC one because its curve will return scores up to 1 and this will score higher when close to a WC. The Move To WC action cannot return a value much higher than 0.7 for score because one of its considerations returns 0.7 as its max value.
Move To Bed
This action uses MoveToSmartObject and it checks 100 meters and the object should have a Bed tag and of course be Owned by the agent.
The considerations are naturally a check for the energy of the agent and another for the target distance check.
The distance check uses SmartObjectDistanceConsideration and sets the required slot status as Owned.
When the slot status contains owned then the smart object system checks the actual ownership of the agent toward that smart object.
Sleep
Each agent has his/her own place to sleep. Either a bed or a furniture is his/her sleeping place.
The action uses BlackboardActionWithSmartObjectTarget class and the slot status is set to Owned.
The radius is 1 meters and the tag is Bed for the search for the target in the smart object system.
The action increases by 0.05 every second.
The considerations are SmartObjectDistanceConsideration and the usual BlackboardFloatConsideration.
The float checks the Energy key on the blackboard and has inverse checked.
The distance checker has the slot status is set to Owned so the distance check cares if the object is owned by the agent or not.
The action itself had this too so each bed will only score high and only gets included in the list of targets for their owners.
And I'm being very very lose when I call all of them beds. Some agents sleep on the couch!
Move To Entertainment Unit
This action finds smart objects with a specific tag which in this case is Entertainment and then moves to the chosen target.
The class that it uses is MoveToSmartObject.
This action will fail if no free slots can be found on the smart object and also will fail if there is no path/possibility of movement to the object by the agent's movement component.
The action has two considerations very similar to the ones the Move To WC above had but the ownership requirements of the smart object would mean that no two agents will use the same Entertainment slot on an object. The considerations are
- A EntertainmentFloat consideration which is a
BlackboardFloatConsiderationchecking the Entertainment float key on the blackboard and returning up to 0.5. It has inverse checked so an empty Entertainment will return 0.5. - And a TargetDistanceConsideration which for up to 100 meters return a value between 0 and 0.8 and naturally for closer distances will return a higher value so the closest target is chosen.
The reason that the non-targetted Entertainment float check returns 0.5 at maximum is that going to an entertainment object is one of the least important things when other options are going to WC, eating, sleeping and ...
Entertainment
Similar to Use WC, simply increased the Entertainment attribute of the agent.
BlackboardActionWithSmartObjectTarget is the action class used and it finds smart object targets and the changer of the action increases Entertainment increases by 0.1 per second.
The target search happens with the smart object system in 3 meters for objects which have the Entertainment tag.
This action does not choose a target which does not have a free slot just ilke the Move To Entertainment so a TV used by somebody else will not be used by this agent.
There are two considerations which one of them is a targetted consideration checking target distance called SmartObjectDistanceConsiderations. This consideration can optionally check the distance with the closes slot of a specific status instead of the position of the GameObject. We use the slot position here because the slot is far away from the GameObject transform. This one doesn't use ownership but beds and furniture which agents sleep on use ownership. The other one is a BlackboardFloatConsideration which checks the Entertainment key of the blackboard. The curve returns up to 1 and has the inverse checked. This means this action will be chosen over the movement one when it socres high since that one will never scores 1.
Go To Refrigerator
This action is the same as Move To WC and moves to a target which has the Food tag. The differences are the tags and the blackboard key checked and used which is Hunger and the curve shapes.
Eat
This is very similar to Use WC as well and just increases Hunger attribute. The considerations are for checking Hunger level and target distance as well. Check Use WC for more details.
Drive
This is the first job action that we are encountering. All humans have jobs either as oak gatherers, programmers or drivers. Each job requires at least two actions like Go To Car/Go to laptop and then drive/programming.
The Job key in the blackboard tells what job the agent has and changing it would actually change the job of the agent. 0 is programming, 1 is driving and 2 is oak gathering.
This action is the driving aprt after the human went to his/her vehicle.
The class used for the action is DriveAction which is a custom action which inherits from BlackboardActionWithSmartObjectTarget.
The action that this inherits from finds targets by using the smart object system and does nothing else other than being able to change the blackboard.
The custom action just claims and uses the smart object and waits for it to finish driving and the going home time arrives and then it finishes the action successfully.
The CarBehavior which is described below is a smart object behavior with a coroutine which simply moves the car around.
protected override void OnStart()
{
    base.OnStart();
    carSmartObject = ChosenTarget.GetComponent<SmartObject>();
    carBehavior = ChosenTarget.GetComponent<CarBehavior>();

    if (carSmartObject.Claim(0, Brain.gameObject))
    {
        carSmartObject.Use(0, Brain.gameObject);
    }
}

protected override void OnUpdate()
{
    base.OnUpdate();
    //waits for the driving to finish and final hour of the job arrives and then finishes the action successfully
    while (carBehavior.IsDriving)
        return;

    while (DayAndNightCycle.Instance.GetHour() < endDrivingTime)
        return;

    carSmartObject.FreeAllSlots();

    ActionSucceeded();

}
As you can see the OnUpdate() which is the important part simply waits for the driving and time to finish and then frees the object and declares success.
The considerations are:
- BlackboardInValueConsideration which checks a blackboard key to be a specific int value. It is a binary consideration which returns 1 only when the int key is equal to ExpectedValue. Here Job is checked to be 1 (means driver)
- The SmartObjectDistanceConsideration checks up to 3 meters and it returns 1 for almost all of them. Keep in mind that this will only considers targets added by the action so a far away car will not be considered at all. The search radius is 3 meters in the action.
- There is a Time Of Day consideration which only return 1 between 10:00-18:00.
Car behavior
The car is a smart object which is used by human agents which have the driver job. The CarSmartObject prefab uses the NavMeshAgent component for movement. It has a SmartObjectSlotOwnerSetter component which sets the owners of slots based on what you put in its SlotOwners array. It has a CarBehavior smart object behavior script and it also has a SmartObject component which references a smart object definition with one slots and a reference to the driving behavior (described below) as its behavior.
CarBehavior.cs's main methods which are overriden for the behavior are like this
public override void OnClaimedByAgent(GameObject agent, SmartObject smartObject, int slot)
{
    base.OnClaimedByAgent(agent, smartObject, slot);
    agent.GetComponent<HumanAgent>().StartDrivingState(smartObject);
}

public override void OnUsedByAgent(GameObject agent, SmartObject smartObject, int slot)
{
    base.OnUsedByAgent(agent, smartObject, slot);
    StartCoroutine(Driving());
}

public override void OnFreedByAgent(GameObject agent, SmartObject smartObject, int slot)
{
    base.OnFreedByAgent(agent, smartObject, slot);
    smartObject.FreeAllSlots();

    agent.GetComponent<HumanAgent>().EndDrivingState(smartObject);
}
As you can see it just tells the human agent to go to driving state when it is claimed and when freed tells it to go back to normal state.
The complex driving logic is in the Driving() coroutine called in the OnUsedByAgent()
private IEnumerator Driving()
{
    isDriving = true;
    navAgent.SetDestination(firstPosition.transform.position);

    while (!IsReached())
    {
        yield return new WaitForSeconds(1);
    }

    navAgent.SetDestination(secondPosition.transform.position);

    while (!IsReached())
    {
        yield return new WaitForSeconds(1);
    }

    navAgent.SetDestination(parkPosition.transform.position);

    while (!IsReached())
    {
        yield return new WaitForSeconds(1);
    }

    isDriving = false;
}

private bool IsReached()
{
    if (!navAgent.pathPending)
    {
        if (navAgent.remainingDistance <= navAgent.stoppingDistance)
        {
            if (!navAgent.hasPath || navAgent.velocity.sqrMagnitude == 0f)
            {
                return true;
            }
        }
    }
    return false;
}
As you can see it is not in fact complex. It starts moving toward a first position and then when reached moves to the second and then to the parking position and then stops.
IsReached() simply checks to see if it arrived to the destination or not.
The reason that it drives like a drunk driver who never was a good driver to begin with, is that NavMeshAgent's movement logic is not made for driving and similar behavior and is more aligned with how a creature would move. Also we did not set street paths so it behaves like this and it is an insult to drunk drivers actually!
Anyways this is how this code drives the car when the agent is acting as driver.
Go To Car
This action uses MoveToSmartObject class to move to the car for driving it.
Each car is owned by an agent and the ownership is set by the SmartObjectSlotOwnerSetter component on the cars.
The action searches for smart objects with the tag Car in 100 meters.
The considerations are:
- DriveJobValue which uses
BlackboardIntValueConsiderationwhich checks to see if an int key is the expected value or not and is a binary consideration. This one returns 1 for Job being equal to 1. The curve returns something a bit higher than 0.7 so the actual driving action above has a bigger chance when the agent is close to the car. - There is a TimeOfDay consideration which returns 1 for the time between 10AM to 6PM.
- And of course a distance consideration for targets which always returns 1 because we don't need to differ between the targets other than checking ownership which the action does when adding targets. We have to have a consideration which scores all targets anyways so we have to include something. Theoratically a distance one can become useful later on in the demo so we added this. Otherwise a constant 1 would be enough. We know each agents only has one car and we have no buying/selling.
Eat Oak
Some of the humans go out to do their oak gathering job and while close to an oak and hungry, they can eat one.
It will look intelligent and logical to do so.
The action class used is DestroyTargetWithTag because the action needs to find oak targets and if one of them is selected, it destroys the target and its changer increases Hunger by 0.15.
The action finds targets by looking for objects with the Oak tag in its 3 meters radius using the tag system
The considerations are a float which checks Hunger and if it is relatively low, it returns values up to 1. And one which checks the target's distance which checks up to 3 meters and its curve returns something close to 1 for almost all values. This means that if hungry and close to an oak, the agent will eat it no matter what. We could check if there are any mice around or not and other things like only do this if very hungry or only if the time to go home is very far away from now but as is, our humans will eat oaks until they are more than half full.
Go To Oak Hunt
This action moves to a location which the influence map says there are lots of oaks in.
The considerations naturally are a check for the int value of the job which returns 0.5 if the Job key is 2.
There is an InfluenceMapConsideration which serches the Oak map for values greater than 0.7 in its 100 meters radius.
This will put the result in the OakLocation key to move to.
There is also a time of day consideration which is only returning 1 in the time range of 6AM to 4PM.
This action returns at most 0.5 so the more important action of actually gathering or eating oak can score higher in close ranges.
Move To Oak For Gathering
This uses MoveToTrgetWithTag and tries to find objects tagged Oak in the 10 meter radius and move to the selected one if the action is selected.
This action happens after the previous action brings the agent close enough to oaks.
The considerations are designed in a way so if oaks are close by then this will score higher.
The radius for the previous action was 100 meters.
The considerations are a time of day consideration so this happens only from 6:00 to 16:00 and a check to see if Job key is equal to 2. And an important one which checks target distances. It checks the target up to 10 meters and for close ones other than very close ones returns up to 0.9. The job key one returns 0.7 so it has less score than the eating/gathering ones.
Gather Oak
This is a simple DestroyTargetWithTag which has a small radius and looks for objects tagged Oak in 2 meters.
It has a delay for destroying the oak, which looks good and differentiates it from eating as well.
The changer on the action increases Usefulness key of the blackboard by 0.1.
The considerations naturally are a Job key check to be 2 and a target distance and these return values up to 0.8 combined so this is chosen over the above actions other than eating oak if the agent is hungry.
Programming
This action uses BlackboardActionWithSmartObjectTarget to find its laptop and use it and the action's changer increases usefulness by 0.03 per second.
The considerations are a check for the Job key to be 0, a target distance check and a time of day check like the other job considerations.
The distance one checks ownership of the target too. It checks between 0.5 to 2 meters and returns up to 1.
Since programmers usually start late, their time of day for work is between 12AM to 12PM.
The Job key checker that checks to see if it is programmers favorite number is 0 or not and if 0 then it returns 0.5 on the curve.
Go To Laptop
This action is for moving toward the laptop for programming. This action uses MoveToSmartObject class and searches for targets in 100 meters and searches for objects which have the Laptop tag. The considerations are the same as the programming job with different curves and values.
The Job key checker returns 0.5 when the value is correct. The distance one doesn't matter so the distance returns 1 for all of them. The reason taht it doesn't matter is tht there is only one laptop owned by us but there is only one.
Seek Cat
The custom action is SeakingCatAction and it inherits from MoveToTargetWithTag.
This simply finds the best cat in the area and then sets Companionship and TargetCat keys in its blackboard so it can pet the cat.
Read more in the description of this action in the cats section.
Keep in mind that humans pet all cats and don't add their preferences for specific cats.
It is amazing that with only few lines of code we have this relatively complex faction system and the cats and humans can easily change factions and do everything else like changing the faction of others.
We can even have events like holidays well even gray cats great others and then go back to their usual after the event.
The considerations are a check for the human's own Entertainment key which returns up to 1 and has inverse checked, A target distance check which returns at least 0.5 and a IsCatFreeConsideration which checks if the cat is interested in doing this with us and is free or not.
This consideration is described in detail in the cat section but the main code for it is this.
CatAgent cat = target.GetComponent<CatAgent>();
if (cat != null && cat.IsBusy() || target.gameObject == Brain.gameObject || target.GetComponent<BlackBoard>().GetFloat("Emotion") > 0.6f)
    return 0;
else
    return 1;
Pet Cat
This action is the same CatCompanionshipAction which cats use and only gets a high score when a target cat exists and is set in the blackboard.
The only difference is that the changer increases the Entertainment value for the human and not Emotion which is something cats have and apparently humans don't :)
The considerations are only two which checks the two relevant blackboard keys and both of them if they have the correct value, will return 1.
The interface implemented in the HumanAgent like this
public void StartCompanionship()
{
    if (myBlackboard.GetBool("Companionship") == false)
    {
        myBlackboard.SetBool("Companionship", true);
        GetComponent<Brain>().Think();
    }
}

public void EndCompanionship()
{
    myBlackboard.SetBool("Companionship", false);
}

public void WaitForOtherCompanionship(GameObject otherCat)
{
}

public bool IsBusy()
{
    return true;
}
As you can see since the human will not be at the receiving end of this, IsBusy() and WaitForOtherCompanionship()'s implementation don't matter.
Kill Mouse
Kill Mouse is another action like Eat Oak to make humans smarter.
It uses DestroyTargetWithTagAction and if the human is close to a mouse, then the human destroys the mouse.
The action checks for objects with the tag Mouse in 1.5 meters radius.
The only consideration is a distance check always returning one for all targets so if mice are super close to a human, they get killed.
The HumanAgent code
The code of the HumanAgent class is actually first initializing blackboard values.
private void Awake()
{
    indicator = GetComponent<SelectedIndicator>();
    myBlackboard = GetComponent<BlackBoard>();

    myBlackboard.SetFloat("Hunger", Random.Range(0.3f, 0.7f));
    myBlackboard.SetFloat("Energy", Random.Range(0.3f, 0.7f));
    myBlackboard.SetFloat("Bladder", Random.Range(0.3f, 0.7f));
    myBlackboard.SetFloat("Entertainment", Random.Range(0.3f, 0.7f));
    myBlackboard.SetFloat("Usefulness", Random.Range(0.3f, 0.7f));
    myBlackboard.SetInt("Job", job);
    myBlackboard.SetBool("Companionship", false);

}
The job value is read from the job exposed to the inspector so you can change the jobs of the agents in the inspector.
void Start()
{
    personalizedHunger = Random.Range(minPersonalizedValue, maxPersonalizedValue);
    personalizedEnergy = Random.Range(minPersonalizedValue / 2f, maxPersonalizedValue / 2f);
    personalizedBladder = Random.Range(minPersonalizedValue, maxPersonalizedValue);
    personalizedEntertainment = Random.Range(minPersonalizedValue, maxPersonalizedValue);
    personalizedUsefulness = Random.Range(minPersonalizedValue / 2, maxPersonalizedValue / 2);

    LifeSimDemoManager.Instance.AddFollowableAgent(indicator, AgentType.Human);
}
We set the personalized random values for the changes to main attributes so the agents act differently from each other and different simulation runs are different. This is what we do with all other agents including the light simulation as well.
The update function simply decreases all attributes based on the chosen personalized values.
void Update()
{
    float hunger = myBlackboard.GetFloat("Hunger");
    if (hunger > 0)
        myBlackboard.SetFloat("Hunger", hunger - personalizedHunger * Time.deltaTime);

    float energy = myBlackboard.GetFloat("Energy");
    if (energy > 0)
        myBlackboard.SetFloat("Energy", energy - personalizedEnergy * Time.deltaTime);

    float bladder = myBlackboard.GetFloat("Bladder");
    if (bladder > 0)
        myBlackboard.SetFloat("Bladder", bladder - personalizedBladder * Time.deltaTime);

    float entertainment = myBlackboard.GetFloat("Entertainment");
    if (entertainment > 0)
        myBlackboard.SetFloat("Entertainment", entertainment - personalizedEntertainment * Time.deltaTime);

    float usefulness = myBlackboard.GetFloat("Usefulness");
    if (usefulness > 0)
        myBlackboard.SetFloat("Usefulness", usefulness - personalizedUsefulness * Time.deltaTime);


    // Check for mouse click or touch input
    if (Input.GetMouseButtonDown(0))
    {
        // Cast a ray from the camera to the mouse position
        Ray ray = Camera.main.ScreenPointToRay(Input.mousePosition);
        RaycastHit hit;

        // Check if the ray hits the object with a collider
        if (Physics.Raycast(ray, out hit))
        {
            // Check if the hit object is the one you want
            if (hit.collider.gameObject == gameObject)
            {
                LifeSimDemoManager.Instance.SetAsSelectedAgent(indicator, AgentType.Human);
            }
        }
    }
}
It has some code regarding the selection logic like other agents which is discussed below as well.
The car driving behavior calls these two methods.
internal void StartDrivingState(SmartObject smartObject)
{
    humanMesh.SetActive(false);
    GetComponent<NavMeshAgent>().enabled = false;
    transform.SetParent(smartObject.transform);
    transform.position = smartObject.transform.position;
    transform.LookAt(smartObject.transform.forward);
}

internal void EndDrivingState(SmartObject smartObject)
{
    humanMesh.SetActive(true);
    GetComponent<NavMeshAgent>().enabled = true;
    transform.SetParent(null);
    transform.position = smartObject.GetSlotPosition(0);
}
The methods simply hide the agent when it starts driving and makes it a child of the car and does the reverse when driving finishes.
The rest is the ICatCompanionship interface which is described in the actions.
And this concludes our tour of the AI in the codebase.
Maps
We use several influence maps and influence map views as it got mentioned in the review above. All of the maps and views are children of the InfluenceMaps object.

General simulation code
The simulation needs some additional code for the follow camera and updating the UI and advancing time of day. Here we are going to take a very brief look at those scripts to make your job a bit easier.
CameraFollow.csis a very simple camera follow code which tolerates having a null target as well.DayAndNightCycle.csmoves time forward in a 24 hour day and changes its rotation too so you can attach it to your directional light which changes the sky color as well.LifeSimDemoManager.csThis class manages the change of simulation speed, has the code for changing the agent camera follows using Tab and Shift+Tab and other general things. There is no AI code in this class.SelectedIndicator.csIs the code which selects the agent you click on and turns on the indicator on top of the agent's head. The agents themselves check this too and call methods in theLifeSimDemoManagerto change the UI and do some other things. Needless to say the way that we code this can be improved a lot but this has nothing to do with the AI.UIMenu.csManages most UI code to show the correct icon and update the attribute bars and ... The event managers are attached in the editor and not in code.SliderController.csIs the custom bar for the attributes of agents.GameSpeedButton.csThis handles the looks of the button which shows what speed the game is running on.
And after these many pages this is finally over. We are going to improve this tutorial and improve it and make more interesting stuff for you. Thanks for reading and please rate and review the assets if you liked them. Also send us your feedback on discord or using email.